A Designer’s Take on the Halloween Hat Design
First Impression: Whimsy That Feels Polished
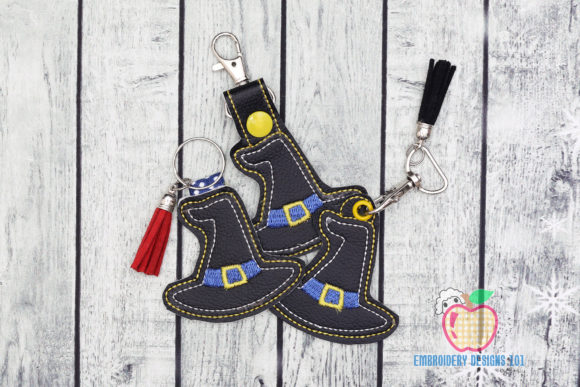
When I first opened the Halloween Hat file, I didn’t see just a holiday motif. I saw a compact, character-filled shape that manages to be playful without tipping into messy or overly cute territory. The outline reads clearly even in thumbnail size, which is a huge advantage if you’re scrolling through a digital embroidery library or creating product mockups for an online shop. The hat’s silhouette is recognizable enough to stand alone as a focal point on a tote bag, yet it’s sized correctly to pair with other seasonal accents—think tiny bats, stars, or subtle lettering.
The mood lands somewhere between nostalgic Halloween fun and a clean modern graphic. That balance matters. Too many holiday embroidery designs lean either childish or overly intricate, leaving no middle ground for customers who want something that feels handcrafted but thoughtful. This one hits a sweet spot. The personality is confident, slightly cheeky, and very wearable. You can imagine it on a kitchen towel in a farmhouse kitchen or stitched small on a child’s tee without overwhelming the garment.
From a digitizing standpoint, the layout appears intentional. There’s a clear relationship between the brim and the pointed crown, and if you look closely, the curves and angles suggest the designer paid attention to how satin stitches will behave on woven fabric. You don’t see awkward overly sharp corners that would pucker under high stitch density, nor do you find clumsy fills that would sink into plush textiles. As someone who has tested hundreds of machine embroidery designs, that first visual check tells me a lot about how smoothly the actual stitching will go.
Real Project, Real Use: A Custom Halloween Tote Bag
Let me walk you through a practical scenario. I needed a quick but memorable item for a local craft market—something that would sell in the $18–$24 range without eating hours of production time. A sturdy cotton canvas tote bag became the canvas. I chose the Halloween Hat design to serve as the hero element, stitched in orange and charcoal on a natural beige background. Right away, I knew I’d get clean registration because the design’s contours don’t rely on hair-thin lines. The brim section gave me enough visual weight to balance the tote’s wide front panel, and the pointed crown created a nice vertical line that moved the eye upward.
Here’s where real-life embroidery thinking kicks in. The tote bag fabric is dense and prone to showing every bobbin tension hiccup. With a design that features moderate stitch density—something I sensed from the preview but verified by running a test swatch—I used a medium-weight cutaway stabilizer and a matching top thread. The result? Crisp edges, zero distortion around the brim’s curved lower line, and none of that dreaded gap between fill stitch and satin outline. Customers at the market kept touching the embroidery, which is always a good sign. When someone runs their finger over the stitches and smiles, you’ve got a sellable product.
What struck me most was how the hat’s motif worked on its own. I didn’t need to add text or a border to make it feel complete. For a small batch of totes done in a single afternoon, that’s gold. You reduce hoop time, thread changes, and complexity, yet the finished product looks intentional and professionally designed.
Where the Halloween Hat Shines Across Product Types
If you run a craft business or sell on Etsy, you know that a single great digital embroidery file can spawn a dozen different product ideas. This design isn’t locked into one category. Here’s where I’d feel confident using it without heavy modifications:
- Custom apparel: small chest placements on sweatshirts, crewneck pullovers, and long-sleeve tees. The motif sits comfortably inside a 4x4 hoop without feeling cramped.
- Baby and toddler embroidery: scaled down slightly, the hat becomes a gentle seasonal detail on a onesie or a bib. No worries about dense fills irritating sensitive skin, as long as you float a soft backing.
- Patches: because the outer shape is distinct, you can stitch it on felt or twill with a merrow-style border and create standalone embroidered patches for jean jackets or backpacks.
- Kitchen textiles: tea towels, apron pockets, and oven mitts welcome this motif happily. The theme is festive but not overwhelming, so customers might keep the towel out all October.
- Pillow covers and home decor: repeat the design in a smaller size to create a pattern, or use it as a single accent on a linen cushion. It leans decorative without shouting “costume party.”
- Gifts and personalized items: add a name or a short phrase beneath the hat using a coordinating font, and you instantly have a personalized Halloween gift that feels store-bought but with a handmade soul.
Fabric and Garment Realities: What to Watch Closely
Not every blank is a good home for the Halloween Hat. I always run through a mental checklist of risky scenarios before hitting the start button. The design’s moderate detail level means it can handle smooth surfaces beautifully, but certain challenging fabrics need extra care—or a smart decision to avoid them entirely.
On thin or sheer fabric, like a lightweight rayon blouse, the satin stitch sections might pull and cause puckering even with the right stabilizer. If you must stitch there, use a water-soluble topping and a very soft cutaway, but expect to do a test run. Stretchy athletic wear can be tricky too. The hat’s outline, while clean, has enough direction changes that spandex blends might warp under needle penetration. A fusible mesh stabilizer plus temporary adhesive spray are your friends, but I’d stick to woven cottons or French terry for the most predictable results.
Dark fabrics present a contrast puzzle. If the thread colors you pick for the hat band or buckle are too dark, the silhouette can flatten into a murky blob. Test your color choices on black or navy scrap fabric first. Sometimes a subtle silver or light gray accent makes all the difference. Conversely, on white or cream backgrounds, you can go bolder with traditional orange and purple without losing the crisp outline.
Curved surfaces like baseball caps are a maybe. The hat design’s verticality might fight the cap’s center seam and compound curve. You can try it with a cap hoop and slow your machine speed significantly, but be prepared for some registration challenges near the brim’s ends. A flat patch stitched separately and then attached to the cap is often a safer route if you’re making merchandise for a retail customer.
Visual Appeal and the Perceived Value Jump
When I audit a design for client work, I ask: does this make a simple product look expensive? The Halloween Hat does exactly that. On a basic cotton tee, it adds just enough stitch texture to elevate the shirt above a typical screen-printed graphic. The fill stitch areas, if digitized well, create a gentle quilted effect that feels substantial to the touch. That tactile quality is what online buyers can’t fully see in photos, but once they receive the item, they instantly perceive higher value. This is the kind of embroidered asset that turns a one-time buyer into a repeat customer who trusts your shop’s quality.
Another angle is how the design influences brand consistency. If your small shop specializes in polished seasonal goods rather than cartoonish novelty, this hat motif slips right into your existing style lineup. It won’t clash with your minimalist logo or your carefully curated color palette. I’ve seen too many craft businesses dilute their brand by using wildly inconsistent embroidery styles. This design, with its controlled shape and balanced proportions, helps you avoid that mistake.
From a giftability perspective, people feel proud giving a handcrafted item that looks intentional. The hat’s iconic Halloween silhouette is universal enough that a grandparent buying for a grandchild recognizes it instantly, yet it’s rendered in a fresh way that doesn’t feel mass-produced. That recognition factor shortens the decision-making time for buyers at craft fairs, which often translates into higher sales velocity.
Practical Embroidery Designer Notes for a Smooth Run
Before you commit to a full production run, here are the steps I’d personally take, and I urge any maker or small business owner to do the same. These aren’t theoretical tips—they’re born from years of ruining good fabric while learning.
- Test on matching scrap fabric. Don’t assume that what looks flawless on woven cotton will behave identically on a fleece sweatshirt. Run the Halloween Hat design on the exact blank you plan to sell, including any stabilizer combination you intend to use in production.
- Inspect the stitch density. While I can’t provide exact numbers, you can get a feel by watching how the needle moves during the first few thousand stitches. If your machine hesitates or thread breaks frequently in fill stitch areas, you may need to adjust tensions or consider lowering density slightly, if your software allows editing.
- Check color contrast in grayscale. Convert a photo of your test stitch-out to black and white. If any part of the hat washes into the background or loses definition, tweak your thread palette until the silhouette holds strong even without color cues. This helps the design perform on camera in product listings.
- Confirm your hoop size before purchasing. The product description mentions multiple embroidery file formats and machine compatibility, which is excellent—but you’ll still want to verify that the design’s dimensions fit the hoops you own. A design that barely squeezes into a 4x4 hoop might not stitch comfortably near the edges, so keep that in mind.
- Review the provided file formats. Since the listing states multiple formats are included, locate the one your machine prefers. Missing a specific format is rare these days, but it’s worth double-checking before you plan client deadlines around it.
- Understand commercial use terms. If you intend to sell finished items at a craft show or on Etsy, ensure the license permits that. Many digital embroidery files come with personal-use-only restrictions. Look for the license terms within the download or ask the designer directly.
Thread Choices That Make the Stitching Sing
I’ve already hinted at color strategy, but let’s dig a bit deeper because thread can make or break the Halloween Hat’s impact. The classic orange-black combo works, but it’s predictable. For a boutique twist, try a dusty terracotta with deep charcoal, or a soft apricot with muted olive. If you’re aiming at a younger crowd, a vivid neon orange with crisp white accents on heather gray sweatshirt fabric looks surprisingly fresh. Avoid extremely light pastel threads for the main hat body unless you’re stitching on a dark background, because low contrast can cause the shape to melt into the textile.
Variegated threads are an underutilized tool here. Using a subtle color-shifting thread on the crown alone can give the impression of changing shadows, adding depth without any extra digitizing. Just test the stitch direction to make sure the color changes don’t distract from the overall hat outline.
Pairing the Design with Other Elements
If you’re a digital product seller or create printable mockups, the Halloween Hat serves as a strong asset in a layered composition. I’ve used it alongside simple, airy lettering for “Boo Crew” or “Spooky Season” on product previews. The hat’s compact footprint means you can combine it with corner decorations, small stars, or subtle spiderweb motifs without crowding the hoop. When building an Etsy listing photo, a mockup showing a beautifully embroidered tote next to a pumpkin and a cinnamon stick tells a complete story in one glance. That emotional pull is what converts hesitant browsers into buyers.
Final Verdict from a Production Perspective
After putting the Halloween Hat through a real project cycle—from file preview to stitched tote to customer reaction—I’d classify this as a reliable, versatile, and market-ready machine embroidery design. It doesn’t demand excessive thread changes or complicated hooping, which keeps production time down and profitability up. For an Etsy seller racing to fill autumn orders, that efficiency is everything.
The design’s charm lies in its restraint. It embraces the Halloween category without becoming a cliché, and it adapts to multiple blank types without losing its identity. Whether you’re building inventory for a holiday pop-up shop, adding a new digital embroidery file to your collection, or making a handful of personalized gifts for friends, this motif will slot into your workflow without unnecessary friction.
Just remember: embroidery projects live and die by prep work. Use the right stabilizer for your fabric, test your thread color combination on the actual garment, and confirm your hoop dimensions before you begin. Once those boxes are checked, the Halloween Hat is ready to help you create finished products that feel genuinely handmade, professionally executed, and effortlessly festive.